In this tutorial, we are going to mount an additional hard disk in Linux. At first, we list all the disks recognized by our system using the fdisk command:
# fdisk -l
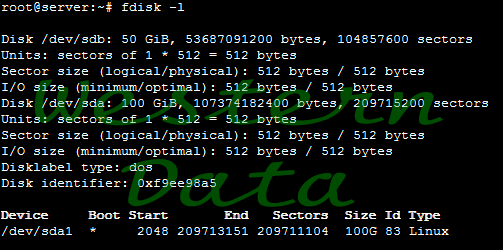
In our example, two hard drives are plugged into our server: /dev/sda, our system disk which amongst other things contains the operating system, and /dev/sdb, an additional 50 GiB hard drive which we are about to mount in our system. The naming of those disks can vary.
First of all, we need to create a partition as well as a partition table. Of course, it is possible to create more than one partition on a disk, but in our example, we want to use the whole capacity of the drive for one partition. For the partitioning we use cfdisk, the graphical version of fdisk:
# cfdisk /dev/sdb
If there is no existing partition table on the disk, yet, a menu pops up:
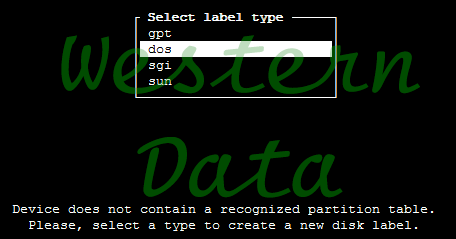
For our example, we choose dos, which writes a MBR partition table to the disk (for disks larger than 2 TB, we would choose GPT, otherwise we would not be able to make use of the entire available disk space). After that, the main menu of cfdisk opens:
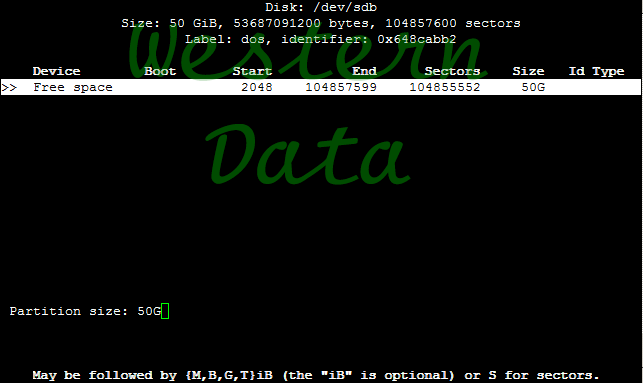
Here we can create our partition(s). We create a 50 GiB partition by entering 50G and confirming with the Enter-Key.
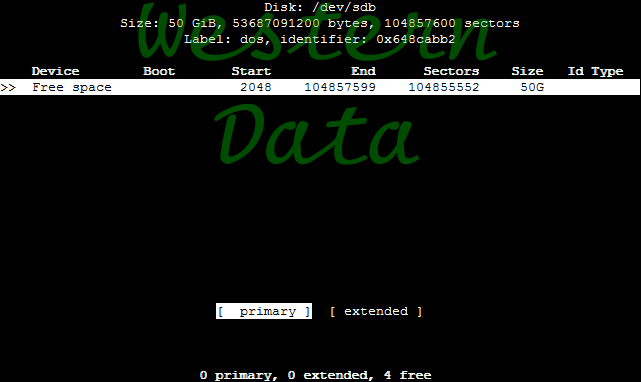
In the next dialogue, we choose primary to create a primary partition.
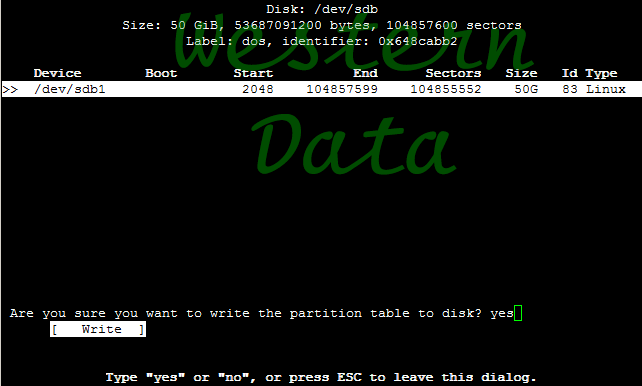
We confirm with Write and type in yes to finish creating the partition. Now we have a partition, but we cannot store data on it yet, as we still need to create a file system on it. We choose Quit to leave cfdisk and check if the partition has been created properly. To do so, we once again use fdisk:
# fdisk -l
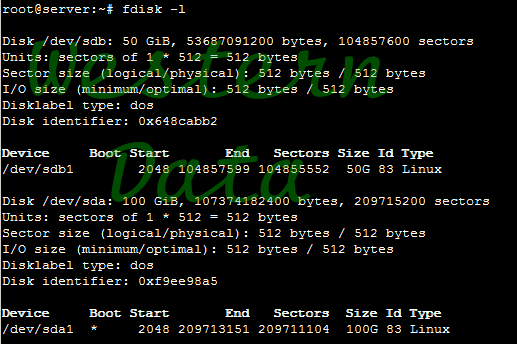
Our new partition is now listed as /dev/sdb1. Thus, everything went as expected.
Now, we're going to format the partition with a file system. In Linux, we choose ext4 by default.
# mkfs.ext4 /dev/sdb1
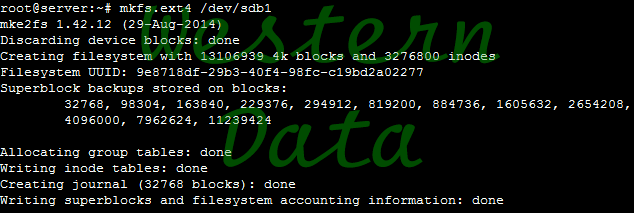
The formatting is now finished and the hard disk is now prepared for utilisation. Next, we create a folder in which we mount the partition. All data we move or create in this folder after the whole procedure will be stored on our new hard drive. In our example, we use the namedatastore for our folder, but of course you are free to choose any name you like. With the following command, we create the new folder:
# mkdir /datastore
In order to mount the partition in the folder we just created, we type the following in our command line:
# mount /dev/sdb1 /datastore
Our partition is now mounted in /datastore. In order to automatically mount the partition after a reboot, we add a line in the configuration file /etc/fstab. But before we do so, we need to find out the UUID of our partition.
# blkid /dev/sdb1
![]()
The part after "UUID=" is the UUID of our partition. We copy it (without the quotation marks) and open /etc/fstab in a text editor:
# nano /etc/fstab or, # vi /etc/fstab
With the arrow keys, we navigate our cursor to the end of the file and paste the following line:
UUID=d6ae62ff-c9b7-4a07-aea8-a36f55c5036d /datastore ext4 defaults 0 0
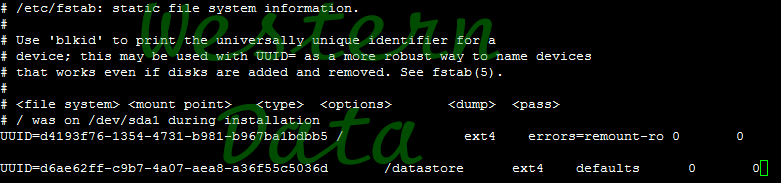
Make sure to replace the UUID with your actual one.
