
A System Restore Point is one of the most effective ways to protect your Windows PC from sudden virus attacks, faulty driver updates, or system crashes. However, creating restore points manually every day is inconvenient and easy to forget.
In this guide, you will learn how to set up an automated system in Windows that creates a restore point every day. Additionally, when disk space fills up, Windows will automatically delete backups older than 10–12 days to ensure your drive space remains optimized while keeping your recent backups safe.
Step 1: Enable System Protection in Windows
First, ensure that the System Protection feature is enabled on your laptop or PC.
- Press Windows Key + R on your keyboard to open the Run dialog box.
- Type
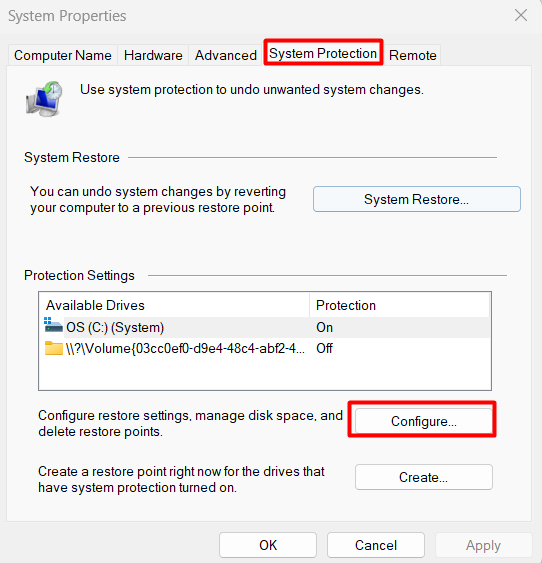
sysdm.cpland press Enter. - Click on the System Protection tab at the top.
- Select your system drive (usually System (C:) (Local Disk)) and click the Configure... button below.
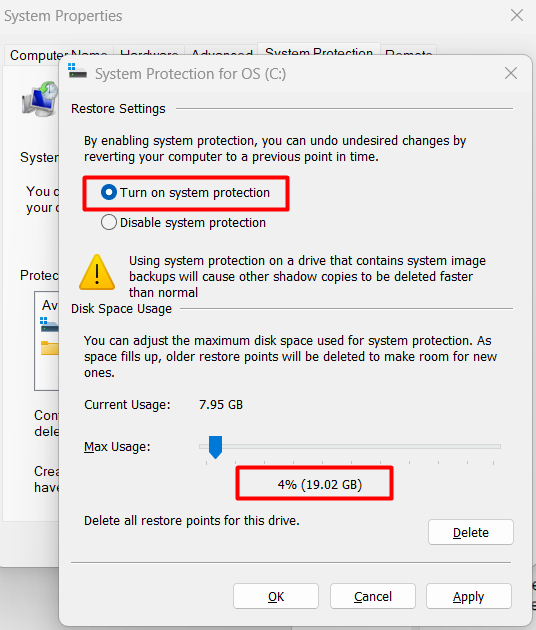
- Select the Turn on system protection radio button.
Step 2: Allocate Storage Space for Backups (Max Usage Set)
This step is crucial because it determines how many days of backups can be stored on your drive.
- While still in the Configure window from Step 1, locate the Max Usage slider at the bottom.
- Drag the slider to 10%–15% (or approximately 10 GB–15 GB).
- How it works: A single restore point typically takes between 300 MB and 1 GB of storage. Allocating 10 GB allows Windows to store approximately 10 to 15 days of restore points in the background.
- What happens when space is full? Once the allocated 10 GB is filled, Windows automatically deletes the oldest restore point (e.g., 10–12 days old) and saves the newest one. Your drive will never run out of space.
- Click Apply, then click OK to close the window.
Step 3: Create an Automated Daily Backup Task (Task Scheduler Setup)
Now, we will schedule Windows to automatically create a restore point at a specific time every day.
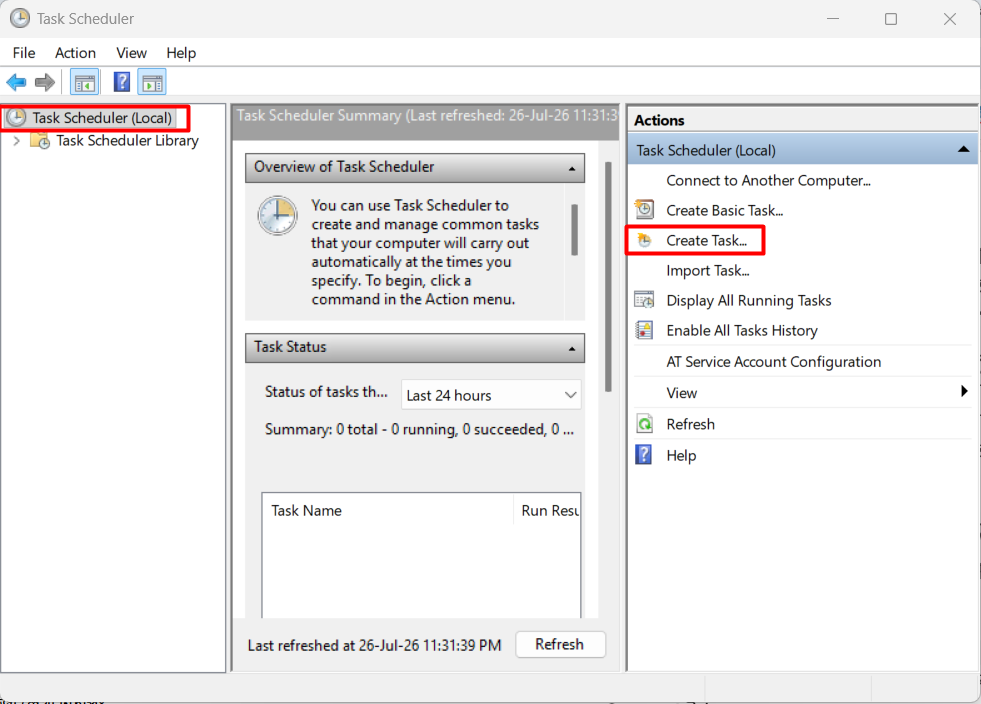
- In the Windows Search Bar, type Task Scheduler and open it.
- In the right-hand panel (Actions), click Create Task...
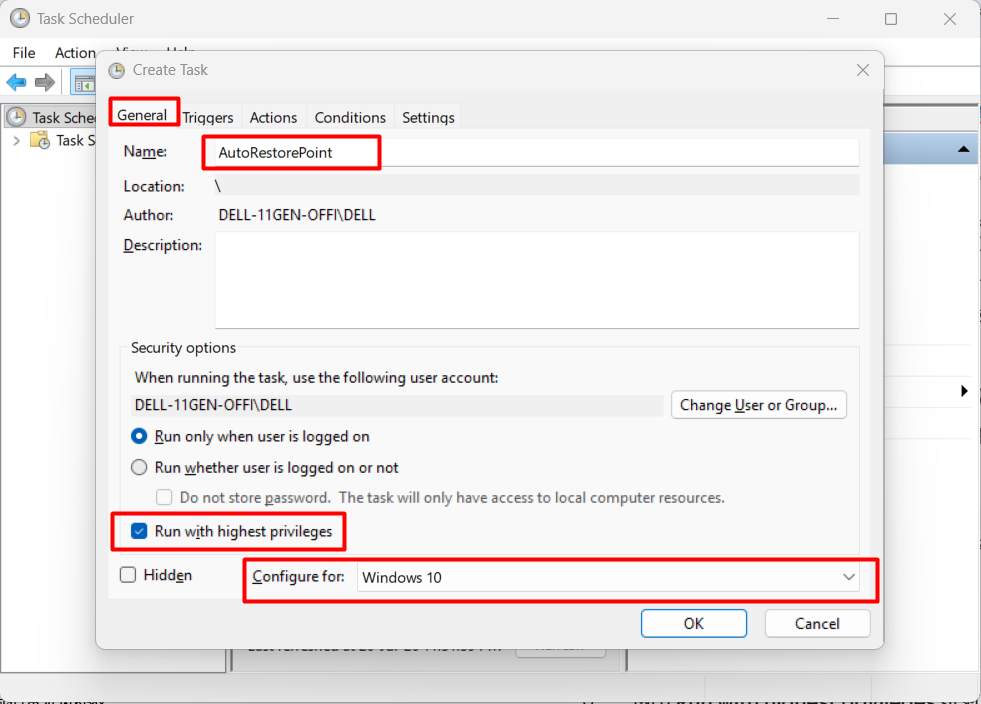
- General Tab:
- In the Name field, type:
AutoRestorePoint - Check the box for Run with highest privileges.
- Under Configure for, select your current Windows version (e.g., Windows 10 or Windows 11).
- In the Name field, type:
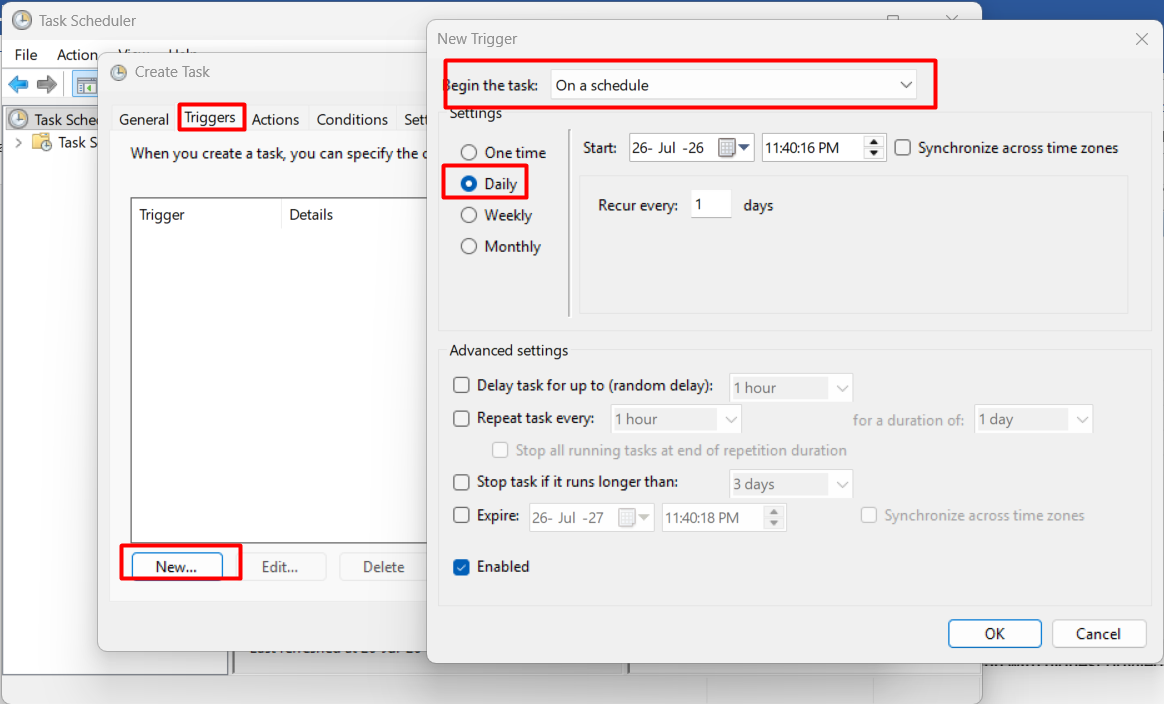
- Triggers Tab:
- Click the New... button at the bottom.
- Ensure Begin the task is set to On a schedule.
- Select Daily and set your preferred time (e.g., 12:00 PM). Click OK.
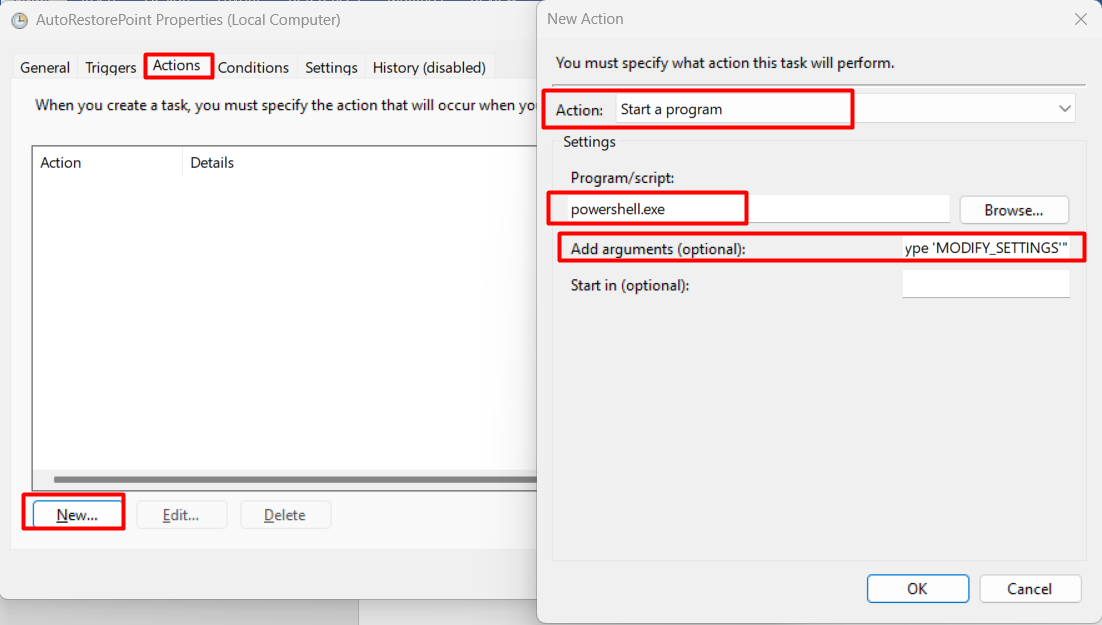
- Actions Tab:
- Click the New... button at the bottom.
- Ensure Action is set to Start a program.
- In the Program/script field, type:
powershell.exe - In the Add arguments (optional) field, copy and paste the following command exactly:
-ExecutionPolicy Bypass -Command "Checkpoint-Computer -Description 'DailyAutoRestore' -RestorePointType 'MODIFY_SETTINGS'" - Click OK.
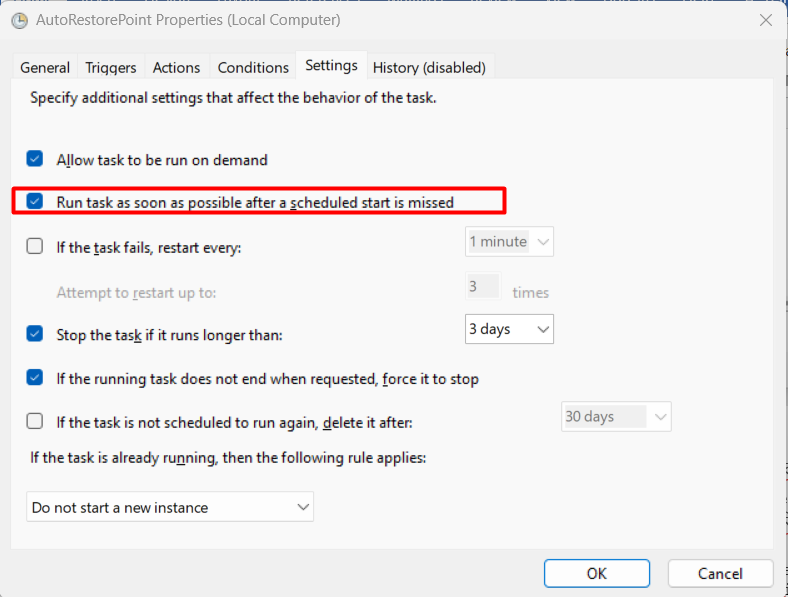
- Settings Tab (Crucial setting for missed schedules):
- Switch to the Settings tab.
- Check the box for "Run task as soon as possible after a scheduled start is missed".
(Benefit: If your laptop is powered off at the scheduled time, Windows will automatically create the missed restore point as soon as you turn it on.)
- Click OK to finish creating the task.
| Important Note (If you accidentally clicked OK before completing Step 6):
Do not worry if you saved the task prematurely! Follow these steps to modify it:
|
3 Easy Ways to Test if the Setup Works
You can verify that your automated task is executing properly using any of the following methods:
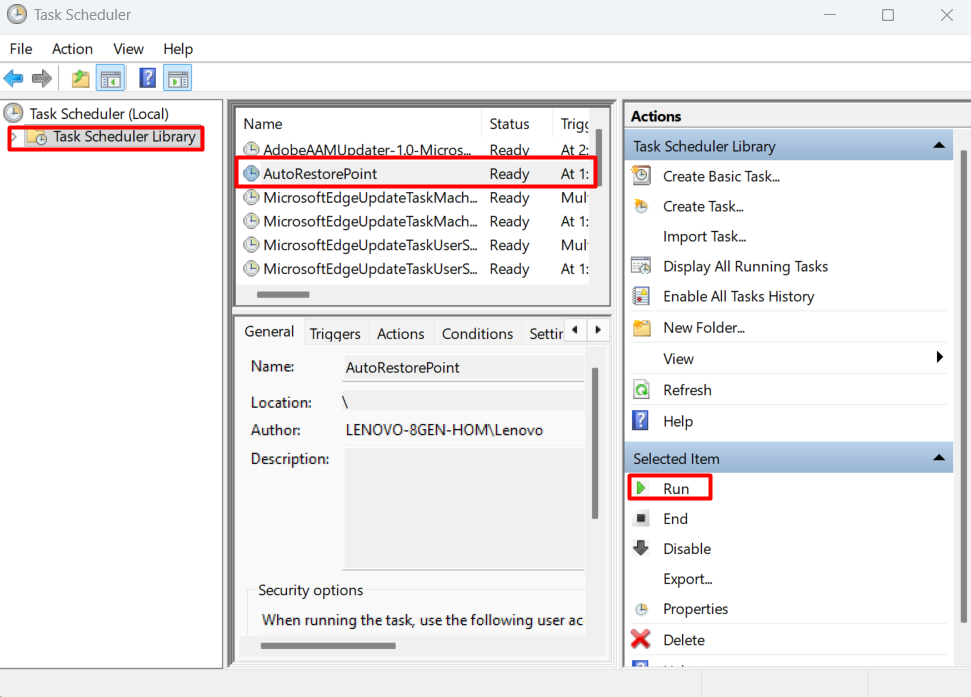
Method 1: Manually Run and Test from Task Scheduler (Easiest)
- Open Task Scheduler.
- Click Task Scheduler Library on the left panel and select
AutoRestorePoint. - Click Run in the right panel under Selected Item (or right-click the task and select Run).
- The cursor will show loading for a few seconds as the restore point is created in the background.
- Click Refresh in the middle panel. Check the Last Run Result column—if it displays
The operation completed successfully. (0x0), your setup is working perfectly!
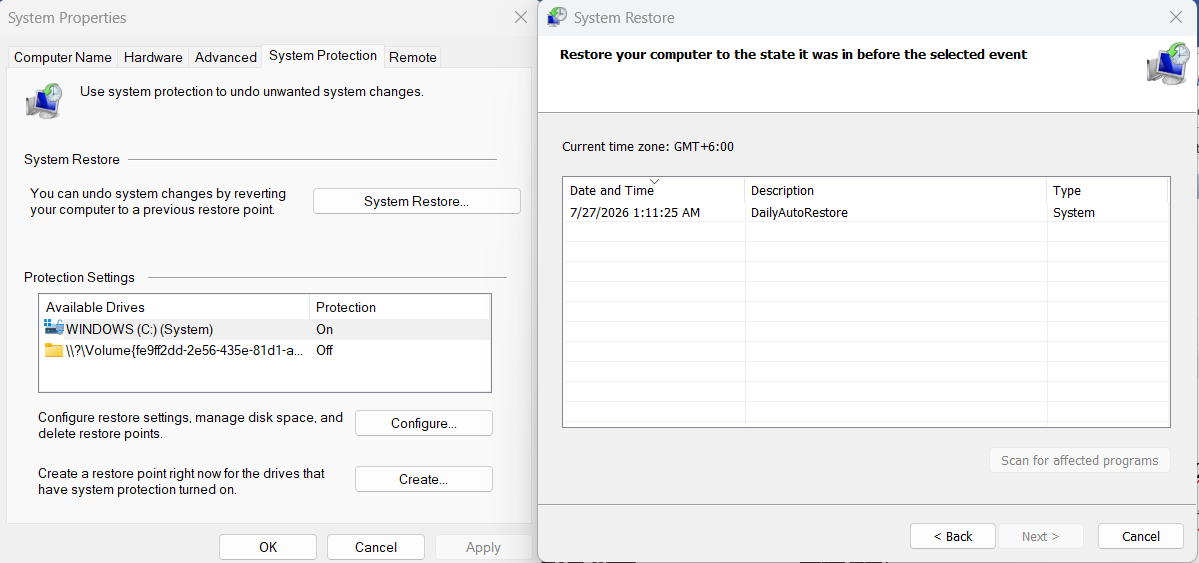
Method 2: Verify from System Restore List
- Press Windows Key + R, type
sysdm.cpl, and press Enter. - Go to the System Protection tab.
- Click the System Restore... button in the middle.
- Click Next.
- You should see a newly created restore point titled
DailyAutoRestorewith the current timestamp. (Click Cancel to close once verified.)
Method 3: Quick Test via PowerShell
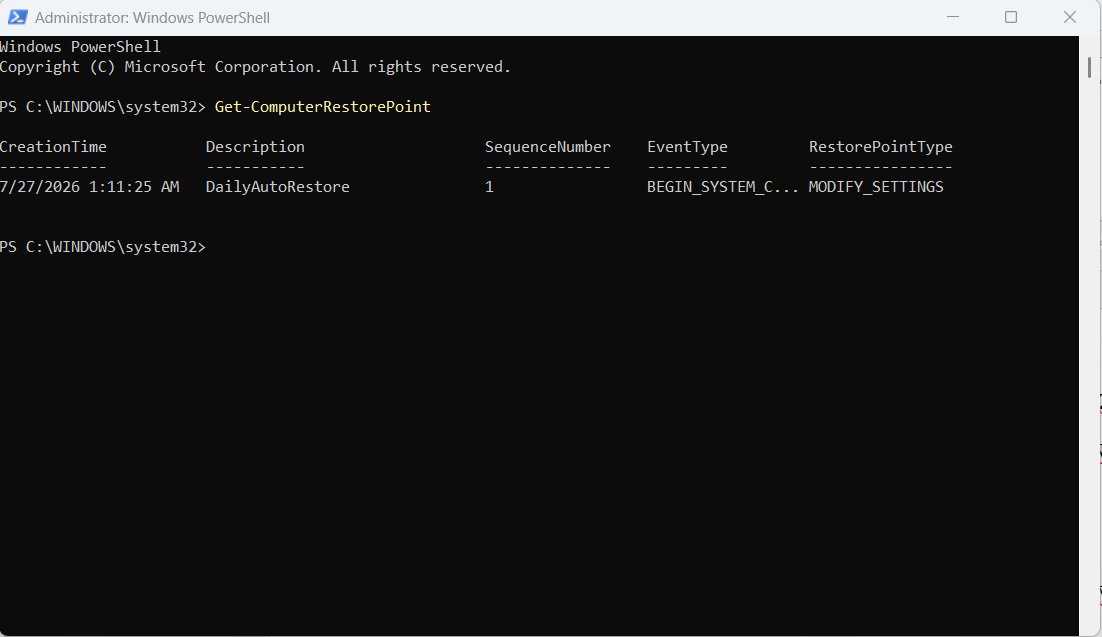
- Search for PowerShell in the Windows Search Bar and click Run as administrator.
- Type the following command and press Enter:
Get-ComputerRestorePoint - A table listing all system restore points, including their creation dates and descriptions, will be displayed.
Frequently Asked Questions (FAQ)
Q: Will this fill up my hard drive over time?
A: No. Because we set the Max Usage limit to 10%–15%, Windows will automatically erase the oldest restore points whenever storage capacity is reached.
Q: What if my laptop is turned off during the scheduled backup time?
A: Thanks to the "Run task as soon as possible after a scheduled start is missed" option in Settings, Windows will execute the backup immediately after you boot up your laptop.
Congratulations! Your automatic daily restore point configuration is complete. Windows will now safeguard your system automatically every day!