fdisk stands (for “fixed disk or format disk“) is an most commonly used command-line based disk manipulation utility for a Linux/Unix systems. With the help of fdisk command you can view, create, resize, delete, change, copy and move partitions on a hard drive using its own user friendly text based menu driven interface.
This tool is very useful in terms of creating space for new partitions, organising space for new drives, re-organising an old drives and copying or moving data to new disks. It allows you to create a maximum of four new primary partition and number of logical (extended) partitions, based on size of the hard disk you have in your system.
This article explains 10 basic fdisk commands to manage a partition table in Linux based systems. You must beroot user to run fdisk command, otherwise you will get a “command not found” error.
1. View all Disk Partitions in Linux
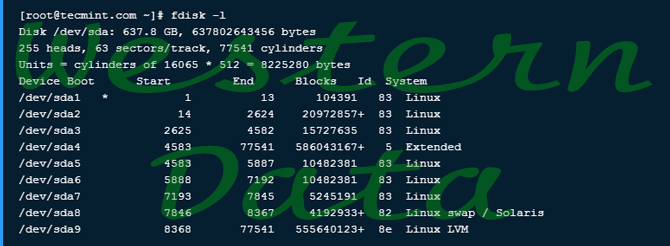
The following basic command list all existing disk partition on your system. The ‘-l‘ argument stand for (listing all partitions) is used with fdisk command to view all available partitions on Linux. The partitions are displayed by their device’s names. For example: /dev/sda, /dev/sdb or/dev/sdc.
2. View Specific Disk Partition in Linux
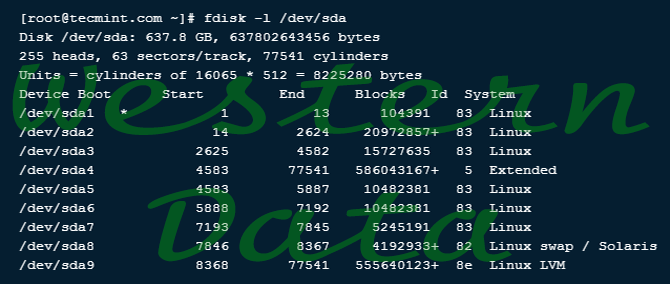
To view all partitions of specific hard disk use the option ‘-l‘ with device name. For example, the following command will display all disk partitions of device /dev/sda. If you’ve different device names, simple write device name as /dev/sdb or /dev/sdc.
3. Check all Available fdisk Commands
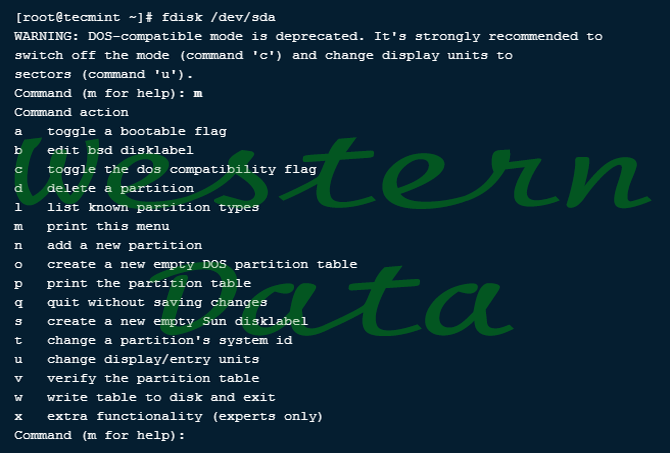
If you would like to view all commands which are available for fdisk. Simply use the following command by mentioning the hard disk name such as /dev/sda as shown below. The following command will give you output similar to below

Type ‘m‘ to see the list of all available commands of fdisk which can be operated on /dev/sda hard disk. After, I enter ‘m‘ on the screen, you will see the all available options for fdisk that you can be used on the /dev/sdadevice.
4. Print all Partition Table in Linux
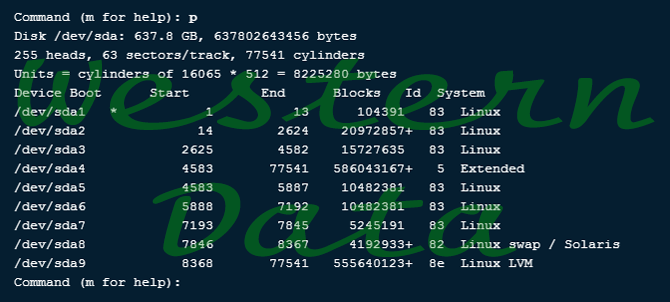
To print all partition table of hard disk, you must be on command mode of specific hard disk say /dev/sda
![]()
From the command mode, enter ‘p‘ instead of ‘m‘ as we did earlier. As I enter ‘p‘, it will print the specific/dev/sda partition table.
5. How to Delete a Partition in Linux
If you would like to delete a specific partition (i.e /dev/sda9) from the specific hard disk such as /dev/sda. You must be in fdisk command mode to do this.
![]()
Next, enter ‘d‘ to delete any given partition name from the system. As I enter ‘d‘, it will prompt me to enter partition number that I want to delete from /dev/sda hard disk. Suppose I enter number ‘4‘ here, then it will delete partition number ‘4‘ (i.e. /dev/sda4) disk and shows free space in partition table. Enter ‘w‘ to write table to disk and exit after making new alterations to partition table. The new changes would only take place after next reboot of system. This can be easily understood from the below output.
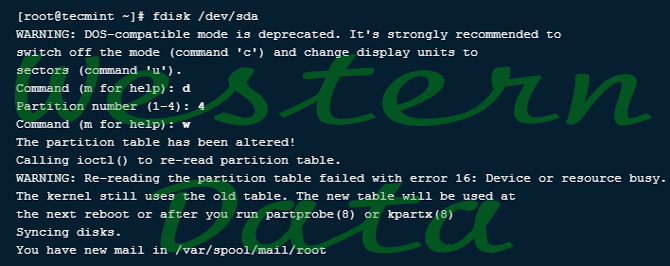
Warning : Be careful, while performing this step, because using option ‘d‘ will completely delete partition from system and may lost all data in partition.
6. How to Create a New Partition in Linux
If you’ve free space left on one of your device say /dev/sda and would like to create a new partition under it. Then you must be in fdisk command mode of /dev/sda. Type the following command to enter into command mode of specific hard disk.
![]()
After entering in command mode, now press “n” command to create a new partition under /dev/sda with specific size. This can be demonstrated with the help of following given output.

While creating a new partition, it will ask you two options ‘extended‘ or ‘primary‘ partition creation. Press ‘e‘ for extended partition and ‘p‘ for primary partition. Then it will ask you to enter following two inputs.
- First cylinder number of the partition to be create.
- Last cylinder number of the partition to be created (Last cylinder, +cylinders or +size).
You can enter the size of cylinder by adding “+5000M” in last cylinder. Here, ‘+‘ means addition and 5000Mmeans size of new partition (i.e 5000MB). Please keep in mind that after creating a new partition, you should run ‘w‘ command to alter and save new changes to partition table and finally reboot your system to verify newly created partition.

7. How to Format a Partition in Linux
After the new partition is created, don’t skip to format the newly created partition using ‘mkfs‘ command. Type the following command in the terminal to format a partition. Here /dev/sda4 is my newly created partition.
![]()
8. How to Check Size of a Partition in Linux
After formatting new partition, check the size of that partition using flag ‘s‘ (displays size in blocks) with fdisk command. This way you can check size of any specific device.

9. How to Fix Partition Table Order
If you’ve deleted a logical partition and again recreated it, you might notice ‘partition out of order‘ problem or error message like ‘Partition table entries are not in disk order‘.
For example, when three logical partitions such as (sda4, sda5 and sda6) are deleted, and new partition created, you might expect the new partition name would be sda4. But, the system would create it as sda5. This happens because of, after the partition are deleted, sda7 partition had been moved as sda4 and free space shift to the end.
To fix such partition order problems, and assign sda4 to the newly created partition, issue the ‘x‘ to enter an extra functionality section and then enter ‘f‘ expert command to fix the order of partition table as shown below.
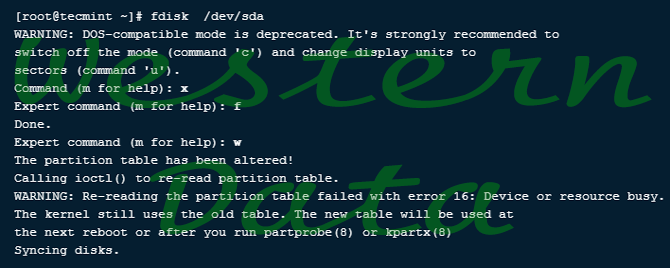
After, running ‘f‘ command, don’t forget to run ‘w‘ command to save and exit from fdisk command mode. Once it fixed partition table order, you will no longer get error messages.
10. How to Disable Boot Flag (*) of a Partition
By default, fdisk command shows the boot flag (i.e. ‘*‘) symbol on each partition. If you want to enable or disable boot flag on a specific partition, do the following steps.
![]()
Press ‘p‘ command to view the current partition table, you see there is a boot flag (asterisk (*) symbol in orange color) on /dev/sda1 disk as shown below.
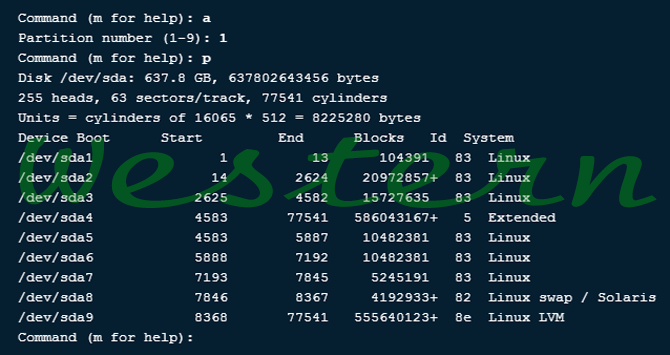
Next enter command ‘a‘ to disable boot flag, then enter partition number ‘1‘ as (i.e. /dev/sda1) in my case. This will disable boot flag on the partition /dev/sda1. This will remove the asterisk (*) flag.

I’ve tried my best to include almost all basic commands of fdisk commands, but still fdisk contains a variety of other expert commands you can use them by entering ‘x‘. For more detailed information, check out ‘man fdisk‘ command from the terminal. If I’ve missed any important command, please do share with me via comment section.

